For Microsoft Project to accurately calculate your project schedule, you will need to specify the working days for the project.
Part of this will include adding recurring holidays and any ad-hoc non-working days to the calendar. These ad-hoc nonworking days could for instance be caused by bad weather, a national celebration day, or another project taking priority.
Specify the Working Days for the Project
The default base calendar of MS Project, the Standard calendar, assumes a Monday to Friday working week. However your project working days may differ from this.
We will look to change the calendar to include Saturday as a working day.
- Click the Change Working Time button on the Project tab of the Ribbon.
- Click the Work Weeks tab on the grid in the bottom half of the dialog box.
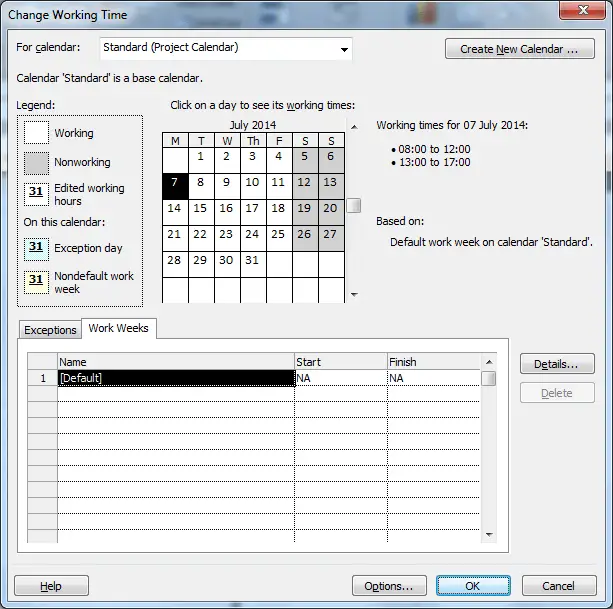
- Click the Details button.
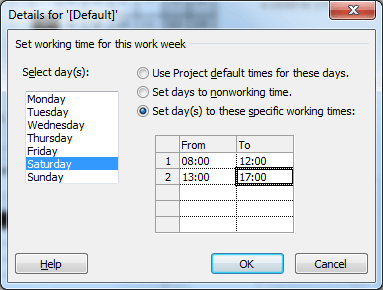
- Make changes by selecting the day or days (hold down the Ctrl key for multiples) from the list and make the necessary changes to the right.
For example, select Saturday from the list of days, choose the Set day(s) to these specific working times option and enter the working times in the boxes provided.
After adding Saturday as a working day we should consider clicking the Options button in the Change Working Time dialog box, and changing the Hours per week setting to 48.
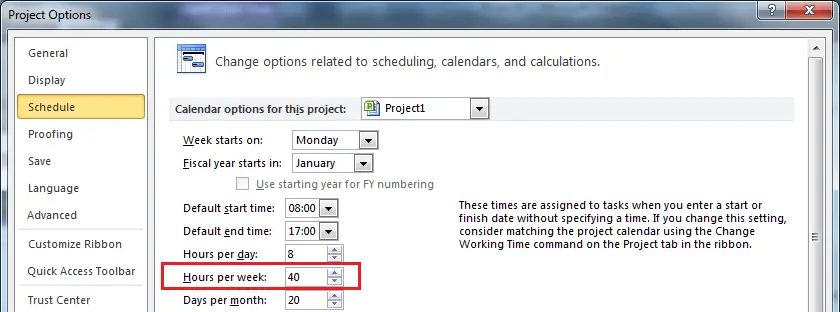
This is important because otherwise if you type a task duration in as 1 week, Project would calculate that the task will take 40 hours to complete. This is inaccurate as we work a 6 day week of 48 hours.
Task durations are commonly entered in hours or days to try and avoid some of this confusion.
Adding Nonworking Days to the Calendar
Nonworking days on the project should be added to the calendar to ensure that tasks are scheduled as accurately as possible.
- Click the Change Working Time button on the Project tab of the Ribbon.
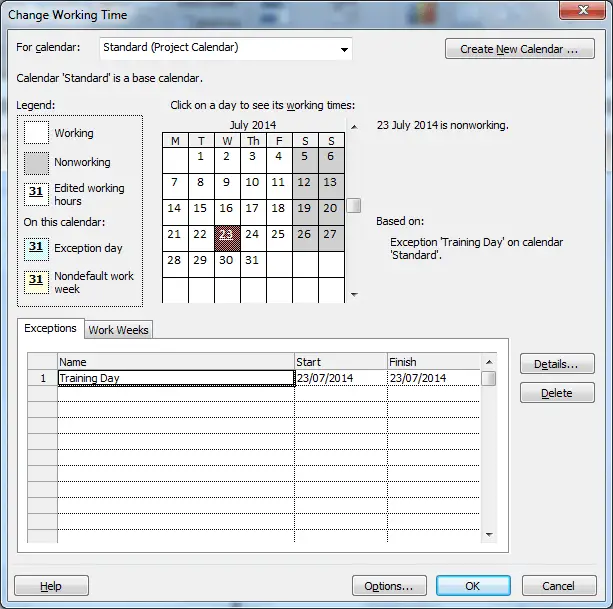
- Click the Exceptions tab on the grid in the bottom half of the dialog box.
- Enter a Name for this nonworking day (this is optional).
- Click in the Start cell and select the start date from the calendar picker.
- Click in the Finish cell and select the finish date from the calendar picker.
- Clicking the Details button is unnecessary in this instance as nonworking is the default option.
Adding Recurring Holidays to the Project Calendar
Recurring holidays and any other type of recurring nonworking days should also be added to the project calendar.
Due to the nature of this type of nonworking day, they can be added well in advance and be applied to future projects to save the hassle of adding them each time.
- Click the Change Working Time button on the Project tab of the Ribbon.
- Click the Exceptions tab on the grid in the bottom half of the dialog box.
- Enter a Name for this recurring holiday or nonworking day and enter the Start and Finish dates for it.
- Click the Details button.
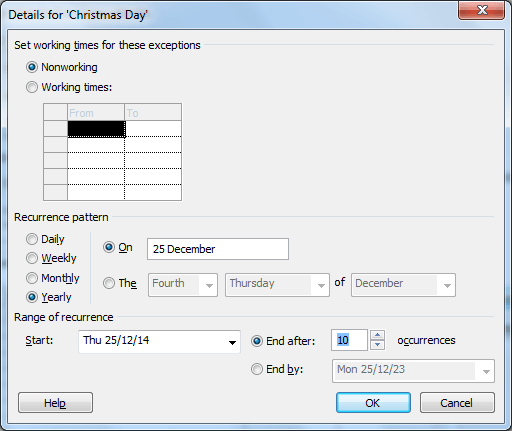
- Select a Recurrence pattern for the nonworking time. This could be for an annual holiday, or for nonworking time that occurs every other Monday.
- Enter a Range of recurrence. This can be entered as a specified number of recurrences, or to end by a specific date.
The image below shows Christmas Day being added to the project calendar. It has been added for the next 10 years.
Make the Calendar Available for Future Projects
Once the calendar is set up, the project can be saved as a template and then used for future projects. The template can also contain many other changes if needed including a task list, resource list, custom views and default settings.
To save as a template;
- Click File and then Save As.
- Select Project template from the Save as type list.
- Enter a name for the file and a location to save the project to. If you save the template to the Templates folder it will be available to you easily when creating new projects.
To create a new project from the template;
- Click File and then New.
- Select the My templates option if you saved it to the Microsoft Templates folder, other choose Create from existing project, locate it and open it.


Leave a Reply