Excel was created for the use of calculating and analysing huge amounts of data. Because of this it has never been great for storing large amounts of text or pictures. Inserting images into a cell would make the spreadsheet even larger and more awkward in its daily use.
Comments are fantastic for leaving notes for other users, but they can also be used to store pictures. These pictures can then be made visible when required rather than permanently displayed on screen within a cell.
Insert a Picture in a Comment in Excel
- Select the cell that you want to add the comment to.
- Click the Review tab on the Ribbon and then click New Comment.
- The comment appears with text displaying the username. This text will appear on top of the picture so let’s delete it.

- Right mouse click on the border of the comment to bring up a menu and select Format Comment.

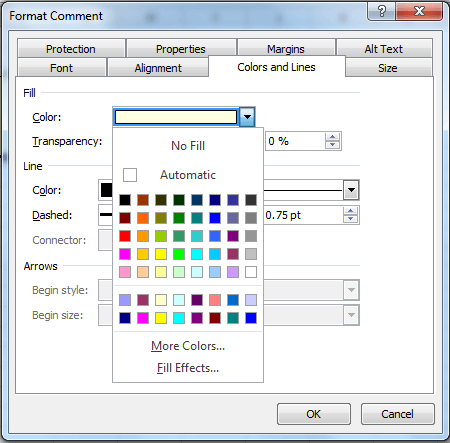
- Select the Colors and Lines tab on the dialog box. Click the Color list arrow and select Fill Effects.
- Select the Picture tab and then click the Select Picture button.

- Locate and select the picture you want to use. Click Ok to both dialog boxes to save your changes and close them.
- The picture appears within the comment box. When you click away from the comment it will disappear.

To view your comments you can simply hover your mouse over the cell containing them. You can also use the Next and Previous buttons in the Comments group of the Review tab on the Ribbon to move through your comments, or click the Show All Comments button to display them all.


Excellent video, very illustrative. Thank you very much for taking the time to post it!
I had been referred to your site through a friend, it has come to light that we cannot subscribe to your newsletter because our email address ([email protected]) fails the email validation, after investigating it appears this is caused by the hyphen in our domain name. Just thought you should be made aware.
Regards,
Graham
Thank you for bringing it to my attention Graham. Sorry to hear that.
what a great video, thank you very much for all your hard work, keep up the good work.
Thanks Mohideen, no problem.
Very useful tip, thank you. We frequently create picture catalogs in Excel to send out to our buyers and could use this concept as well. Currently we’re using a nice add-in utility which we just recently bought that saves our company enormous amounts of time and helps us concentrate on the business rather than act as da Vinci of 21st century. It’s called Picture Manager for Excel and it automatically inserts product pictures (sized fit to cells). Check it out if you’d like, their site is Doality.com
It’s was a great help by your continuous info on your great video lesson. Looks like I’ll not miss your class! Easy to follow well presented.
Thank you. Your comments are much appreciated.
Thanks a lot for your useful post. very helpful
Sir, 16/6/2020.
Very neatly and nicely you have shown the system to insert the picture in
the comment box.
Hope to receive such useful tips and tricks in future too.
Thanking you.
Kanhaiyalal Newaskar.
You’re welcome. Thank you.
Hi Alan – Thanks for your videos. I’m still learning new tricks in Excel after retiring more than ten years ago. I’m using Excel 365, so I had to use a note rather than a comment.
I found the following in Help after I’d figured it out.
“The difference between threaded comments and notes
Excel for Microsoft 365 has changed the way comments work. Comments are now threaded, and allow you to have discussions with other people about the data. Notes are for making notes or annotations about the data, and work like comments used to work in earlier versions of Excel.”
Hi Peter, yes this tutorial is 5 years old and Excel has changed rather a lot in that time. Good to hear you are learning new tricks in Excel 👍