Microsoft Project has many settings that control the behaviour of the application, and of your projects.
These settings can be accessed by clicking the File tab on the Ribbon and then Options. There are many useful options in here, but this blog post focuses on 5 MS Project settings you need to know.
Calculate Multiple Critical Paths in a Project
Although a project can only have one true critical path (the tasks that directly affect the finish date of the project). You may wish to view the critical path for each independent series of tasks.
This can be done to view the critical path for each subproject for a large master project, or maybe you have different independent series of tasks that are performed by different departments or regions in the project.
The Calculate multiple critical paths checkbox is found at the bottom of the Advanced category in the Options window.
Watch this video on using multiple critical paths in MS Project.

Displaying Task Duration in Hours
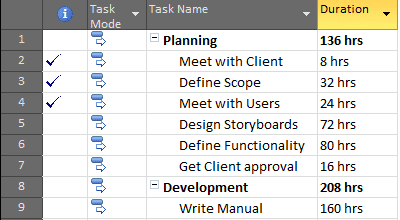
The duration column in the table of the Gantt chart displays the duration of tasks in days by default. However it is just as common, if not more so, to want to see the duration in hours.
The duration of tasks can be entered in hours by simply entering a h after the number of hours you want. For example, 20h for 20 hours.
This however does not affect how the summary tasks display the duration. They will continue to display duration in days. For this we can use the Duration is entered in options in the Schedule category of the Options window.
Watch this video on how to sum the all the task durations in a Project

Setting the Number of Hours in a Day and Week
Following on from the previous setting, if you decide to enter task durations as days, or even as weeks, you will need to set the number of hours in a day and week in MS Project.
This can be done from the Schedule category in MS Project. There are settings for Hours per day and Hours per week.
These settings default to 8 hours per day and 40 hours per week. If you have modified the project calendar to different working times in the day, you may want to think about changing these settings to relate.
However if you enter durations in hours this is not an issue.
Useful tutorials for working with the project calendar.
The Default View
The default view in MS Project is the Gantt Chart. From Project 2010 it is now the Gantt Chart with Timeline.
This view is the one that is displays whenever MS Project is opened, even if you were on a different view when you closed it.
You can choose a different view to display as default. This can be especially useful if you have taken the time to create a custom view for your project.
The Default view option can be found in the General category of the options window.
Task Type and Effort Driven Scheduling
If you are using work resources on a project, you may assign or remove a work resource after the initial assignment to the task. When this happens MS Project will react by either decreasing the task duration, increasing the work value, or decreasing the individual work resource unit values.
What MS Project does depends on two settings, task type and effort driven scheduling. These settings can be controlled for the project, and for individual tasks. We just want to focus on project settings for now.
From Project 2010, the effort driven scheduling option was turned off by default. And the task type option was set to Fixed Units. This means that by default MS Project will increase or decrease the work value when you remove or assign resources to a task after the initial assignment.
You will find the Default task type and New tasks are effort driven options in the Schedule category of the options window.


Leave a Reply