This blog post looks at some productivity hacks for creating professional, consistent and awesome MS Word documents.
These 10 skills are sure to save time and improve overall efficiency in MS Word.
1. Quick Parts and Building Blocks
Building Blocks is a fantastic feature in MS Word where you can store frequently used content for quick insertion to a document.
There are many galleries to the Building Blocks feature including cover pages, tables, headers, footers and text boxes. Quick Parts is the gallery for miscellaneous content that does not fit any of the other galleries.
For example, say I work for a company with 4 different offices. I frequently have to enter the address of these offices into documentation. This entails looking up the correct postcode etc. and then typing and formatting it. With Quick Parts these can be stored for easy re-use.
To save a Quick Part;
- Select the content you want to save. This can be images, text, tables, really anything.
- Click the Insert tab, Quick Parts and then Save Selection to Quick Part Gallery.
- Enter a Name and any other information you deem necessary. And click Ok.
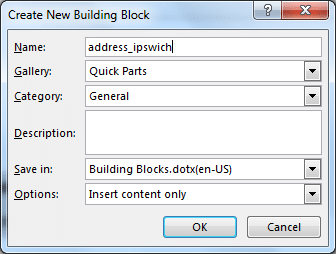
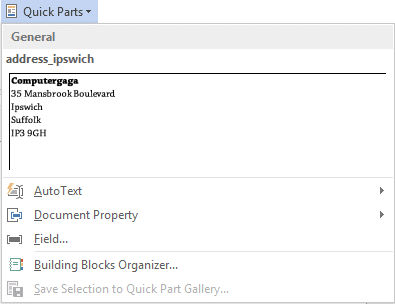
- By saving it to the Building Blocks file, this block of content will be accessible in any other Word document you use. To insert it into a document; Click the Insert tab, Quick Parts and select it from the list of saved Quick Parts.
2. Modifying Autocorrect Settings
AutoCorrect is a feature that will automatically correct typos and spelling errors as you type. This feature should be turned on by default and performs such actions as to capitalise the names of days of the week, and capitalise the start of sentences.
AutoCorrect also contains a built-in dictionary of commonly misspelt or mistyped words and what they should be corrected to. The good news is that we can make our own additions to, or even remove entries that are causing aggravation (sometimes what AutoCorrect views as a mistype, is a correct word).
To edit the AutoCorrect settings;
- Click the File tab on the Ribbon and then Options.
- Click the Proofing category on the left and then the AutoCorrect Options button.
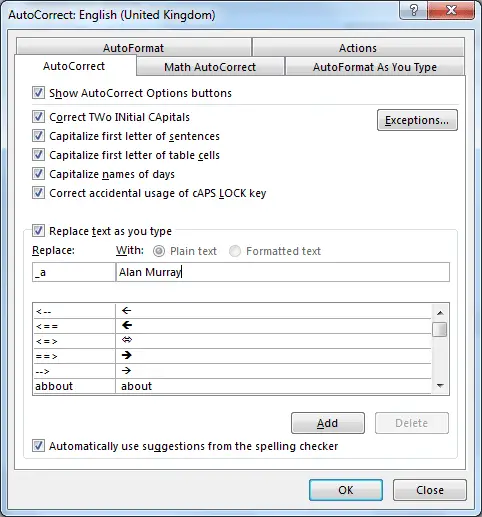
- Type the text you want to Replace and then what to replace it With and click Add. The image below shows replacing the text _a with Alan Murray. This can speed up data entry of my name.
To remove an entry, locate it in the list and click Delete.
The AutoCorrect feature exists in all Microsoft Office applications so any modifications here will be reflected in Outlook, Excel, and PowerPoint etc.
3. Work with Styles
The formatting of everything in Word comes down to styles. By working with styles you can easily and effectively format an entire document in just a few clicks. Styles can also ensure that consistent look to your documents.
There are styles for captions, tables, footnotes, hyperlinks and just about everything. When Word users talk about styles though, they are probably referring to the heading styles.
Heading styles not only provide a quick and consistent format for your headings, but they also give your document structure. Once Word understands where your headers are, then table of contents, cross references and hyperlinks can all be built from the heading styles.
To format a paragraph as style;
- Click in the paragraph you want to format.
- Click the Home tab and select the style from the Quick Styles Gallery.

If the style you want is not shown in the gallery;
- Click the Dialog Box Launcher arrow in the bottom right corner of the Styles group.
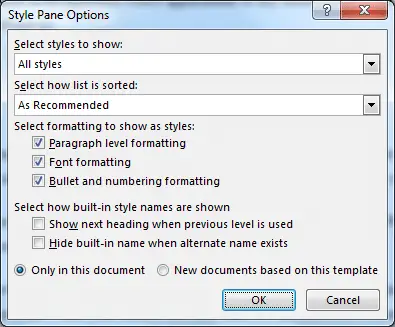
- The Styles pane appears. Click the Options link.
- Click the Select styles to show list and select All styles.
4. The Awesome Format Painter
The Format Painter button is one of my favourite buttons in the entire Office suite, not just MS Word. It is an absolute beast.
It will copy the formatting from one thing to another. This can include copying the formatting from one paragraph to another paragraph, or a picture to another picture and so on.
To use it;
- Select the text or object that contains the formatting you want to copy.
- Click the Format Painter button on the Home tab of the Ribbon.
- Select the text or object(s) that you want to paint with the formatting that was copied.
5. Modifying Default Settings
If you are going to use MS Word a lot, it makes sense to adjust some of the default settings to your own needs. This will save you time in the long run as you will not need to fiddle with these settings when creating future documents.
The video below demonstrates changing 5 useful default settings in MS Word.
It covers;
- Changing the default font.
- Changing the default paragraph after spacing.
- Setting the default spelling language.
- Turning off the Mini Toolbar on Selection.
- Modifying common AutoCorrect settings.
6. Learn Keyboard Shortcuts
Using keyboard shortcuts is the quickest way to accomplish common tasks such as saving, printing, copying, pasting and formatting. Therefore it would seriously improve productivity in MS Word to learn some.
Download this PDF of useful keyboard shortcuts in MS Word. Stick it next to your computer monitor for reference and before long you will remember the ones that are useful to you.
7. Easy Navigation with the Navigation Pane
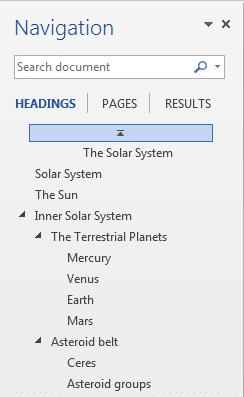
When working on large documents, the Navigation Pane and can be used for quick and easy navigation. For the Navigation Pane to work, you must first format your document using headings styles as described in the Work with styles tip of this article.
To use the Navigation Pane;
- Click the View tab and then Navigation Pane.
- The headers of your document are shown. Jump to the header by clicking its name in the Navigation Pane. You can collapse and expand this outline by clicking the arrows next to the header name.
- You can even re-organise the document from here by simply dragging the headers to their new position in the document.
8. Selection Techniques
There are many selection techniques you can employ to select words, sentences and paragraphs of a document quickly. Here are five you must know;
- Double click with the mouse to select a single word.
- Ctrl + Click to select a sentence.
- Ctrl + A to select all within the document.
- Click and drag in the left margin of the document (selection pane) to highlight paragraphs.
- Select a block of content by clicking at the start, holding the Shift key, and then clicking at the end of the content you want to select.
9. Customise the Toolbar and Ribbon
You can customise both the toolbar and the Ribbon in MS Word. You can add the commands you regularly use so that they are more accessible. This can save time on the repetitive actions that you perform.
To customise the Quick Access Toolbar;
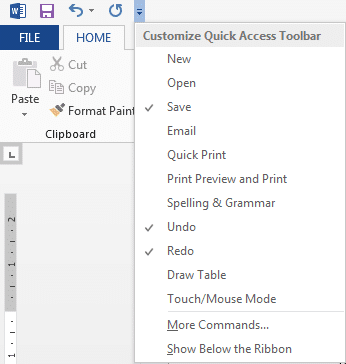
- Click the Customize Quick Access Toolbar arrow.
- A list of popular commands such as Print and Spell Check are displayed. You can select some of these to add to the toolbar, or click More Commands to see more options.
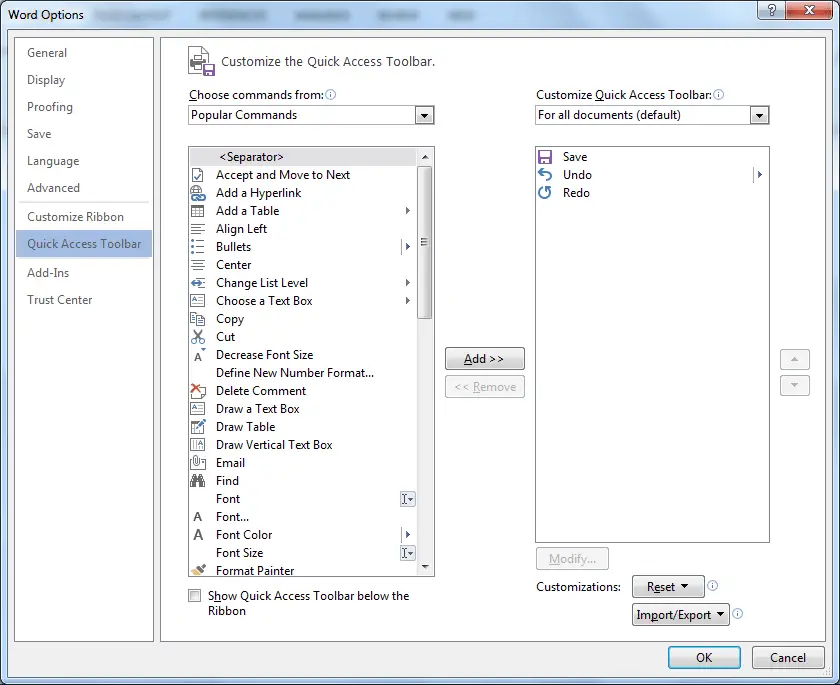
- To find other commands, click the Choose commands from list and select the required tab of the Ribbon, or select All Commands.
- Use the Add button to add the desired buttons onto the toolbar. The arrows to the right of the list of buttons can be used to change the order of the buttons.
The Ribbon can also be customised.
- Right mouse click anywhere on the Ribbon and select Customize the Ribbon.
- You can show or hide the tabs of the Ribbon by checking the box next to the tab name.
- Use the New Tab, New Group and Rename buttons to completely tailor the Ribbon to your liking.
- The buttons of your choice can then be added to the groups and tabs of the Ribbon in a similar way to that of the Quick Access Toolbar.
10. Setting Themes and Colour Schemes
A theme is a collection of formatting which includes a set of theme colours, fonts and also effects such as line and fill effects. A theme can be applied to a document to quickly give it a consistent and professional look.
Themes are great for companies trying to ensure staff create documents with a specific look and feel that meets guidelines and uses a specific colour scheme.
Themes can be found on the Design tab in Word 2013, and on the Page Layout tab in Word 2007 and 2010. To apply a theme to a document, simply select the theme you want to use from the list.
In addition to the built-in themes provided with Word, you can create your own. This is highly recommended to match your preferences.
Let’s look at how you could create your own set of theme colours.
Create your own Set of Theme Colours for a Document
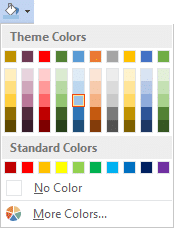
Theme colours contain four text and background colours, 6 accent colours and 2 hyperlink colours. By creating your own set of theme colours, this colour scheme will be easily accessible to the users of the document when formatting the colour of an object or text.
- Click the Design tab (Page Layout in Word 2007 or 2010) and click the Colors button.
- Click Customize Colors (labeled Create New Theme Colors in Word 2007 and 2010).
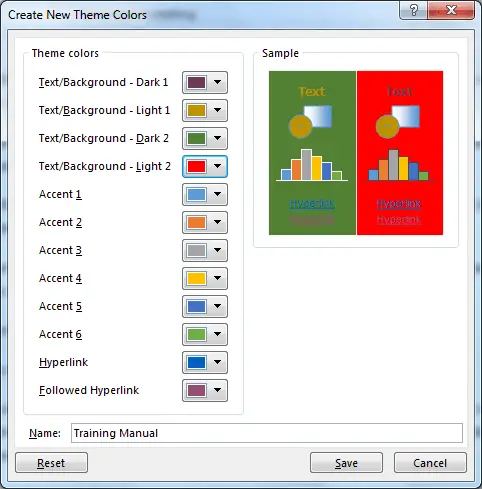
- Enter a name for the theme colours and select the colours you wish to use for each option.
When a set of theme colours has been created, this set is then shown when applying a colour to any part of a document. The image below shows applying a fill colour. The first line of colours are the set of theme colours.
These ten productivity hacks for MS Word should have you producing awesome documents in minimal time. You can focus on creating great content while other aspects of the document are either automatic, or quickly applied.


Leave a Reply